Julie Moenck

Card making, home decorating and an occasional random musing.

Monday, December 20, 2010

Last-Minute Christmas Prep!

I'm pretty prepared for Christmas, but there is always just that "one more thing," isn't there? I made these tags for a workshop early in the month, but they would be a perfect last-minute touch for your gifts. Just get out your card stock scraps, some Stampin' Up! Designer Series (patterned) paper, some punches and ribbon, et voila!

These were inspired by (nearly "CASEd," which means Copy and Share Everything) by my friend and fellow local SE MN demonstrator Angie Bennett. The cardstock is Cherry Cobbler, Very Vanilla and Always Artichoke. The Designer Series Paper (patterned) is Deck the Halls from the Holiday Mini Catalog (only available until Jan. 4!), and the ribbons are Very Vanilla satin, twill tape and Cherry Cobbler seam binding. The stamp set is Perfect Punches, and the punches used are Fancy Label Punch and Round Tab Punch.

Now, the food portion of the program! Since my husband's snowmobile broke down as we were on our way out of the neighborhood, we didn't ride on Saturday. I baked instead. Notice the Christmas Crappies in the lower left?

The sugar cookie recipe is from Real Simple and the Royal Icing from allrecipes.com. This icing worked better than the Martha recipe I tried last year. Just sayin'.


And these couldn't be simpler. I first got the recipe from Kahla years ago...it's so simple, I probably shouldn't tell you how easy it is! But here goes...buy a bag of mini Reese's Peanut Butter cups. Buy a tube of prepared chocolate chip cookie dough. Cut the dough in slices and then in quarters. Place one piece in each cup of a mini muffin tin. Bake five minutes at 350 degrees. Quickly place a PB cup in each half-baked cookie. Bake five more minutes. Yum.


Good luck with your last-minute activities? What do you still have to do? I haven't wrapped a single gift. Guess that's my answer!

Merry Christmas!
Julie

Saturday, December 11, 2010

Blizzard Activities

Today's blizzard showcases my husband's and my very different personalities. He is outside, smoking meat:


I am inside, making Christmas cards:


Later, the baking will commence. I love Christmas!

Thanks for stopping,
Julie

Friday, December 3, 2010

Tag Alongs

No, not the Girl Scout cookies, the Stampin' Up! stamp set that benefits the Ronald McDonald House! These cute penguin tags were made with the Tag Alongs stamp set, which includes three other images to use throughout the year. From every sale of this set, Stampin' Up! donates $2 to the Ronald McDonald House. It was one of the first sets I purchased this (catalog) year.


If you'd like to help the Ronald McDonald House out this year while you do a little Christmas shopping, I'd be happy to set you up with this set.

Happy Holiday Crafting!

Julie

Tuesday, November 23, 2010

Shiny Things

Awhile back, I ordered Stampin' Up!'s brushed gold cardstock so I could show it to someone. I kind of fell in love with it. It looks so nice when dry embossed with our Northern Flurry embossing folder and the Big Shot, so I made this card.

The card also features the self-stick rhinestones that Stampin' Up! offers; cardstock in Bravo Burgundy, Always Artichoke, and Very Vanilla; the Snow Swirled stamp set; and Bravo Burgundy ink.


And, if you're not into the brushed gold, here's a version using patterned paper from the Holiday Mini Catalog and Cherry Cobbler cardstock, and Cherry Cobbler and Soft Suede ink. The rhinestone still made it in!


Thanks for reading,
Julie

Sunday, November 21, 2010

JOY

Yesterday I set up shop at a holiday vendor fair in Zumbrota, my first! It was fun meeting new people from the community and getting in touch with other home party vendors. I'm considering doing another one in two weeks where part of the proceeds go to flood relief in our area...I'm mostly convinced, actually. I just have to commit.

Here's the wall hanging I made as a door prize at my table. A lucky lady from just up the street was the winner, but I haven't called her yet. That's on the list for later today.

This is using the OnBoard Long Board (chip board) from Stampin' Up!, along with Real Red grosgrain ribbon, the Candy Cane Designer Series Paper from the Holiday Mini catalog, and card stock in Baja Breeze, Blushing Bride, and Real Red.

I think I'm going to have to make another, because I don't want to give this one away!

Stay warm and dry today...and don't travel if you don't have to! The ice storm just north of here sounds terrible.

Thanks for stopping,
Julie

Monday, November 15, 2010

Simply Amazing Promotion!

Would you like to save a bundle on great products and have the potential to start your own business...without any scary obligations? Well, Stampin' Up! is offering a promotion on the business starter kit that's never been available before: 50% off!

Today through Nov. 30, the starter kit is $87.50! Regular price is $175, and it contains $310 worth of stamping and business supplies. You can sign up online on my web site with the password julie6.

You know, I started doing this by accident. I signed up to get all the products in the kit, and then, well, I had one workshop and then another...and it's just a lot of fun!

Let me know if you have any questions...I'd love to have you join me!

Julie

Sunday, November 14, 2010

Crafty holiday gift ideas on the cheap!

If you're looking for some quick, cute, handmade gifts this year, check out our team blog. Heidi and I hosted a gift-making event on October 10 called 10-10-10. Visit the team blog to see all the projects and learn more!

Just a quick one for tonight...more this week.

Enjoy the rest of Sunday night,

Julie

Thursday, November 11, 2010

Paper Pumpkins

Last Saturday we attended the annual Anderson Family Chili Feed in our little cul de sac. Andersons make the chili, the guests supply potluck and drinks. (This is starting to sound like another food post, but it's not...mainly because I don't have pictures of my neighborhood-fave deviled eggs. Maybe another time.)

So, since I don't have photos of the food, we'll go back to calling this a craft blog. I made the little pumpkins below, one for me, one for Barb, our Chili Feed hostess-with-the-mostess.


I used eight strips of Peach Parfait cardstock, four from the In Color Series Paper Pack hostess item, and four from the regular cardstock. The strips from the paper pack have a subtle dot pattern to add interest, but you can't really see it in the photo.

The strips are 1.5" x 6", held together at top and bottom by a brad. The stem is five Old Olive buttons (retired) held together by mini glue dots and mini glue-dotted to top of the pumpkin. I also stamped the leaves from the retired Sage Advice stamp set (I don't have ANY leaf stamps or dies!!!), and cut them out by hand. I'm going to order something leafy soon, I promise!

I'm trying to think of what other shapes or items I could make using this technique. Christmas ornaments? What else? Any ideas?

Thanks for reading!
Julie

Monday, November 8, 2010

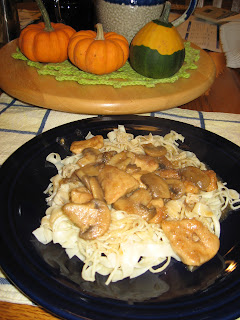
Pheasant Marsala

This is quickly becoming a food-and-crafting blog! I can't resist posting the superb supper DH Joe made for us tonight, so it's another food post.

He took Emeril's recipe for Chicken Marsala and turned it into Pheasant Marsala, using the bounty from his recent South Dakota hunt.


Since he couldn't find marsala wine in our little burg, he made his own with cooking sherry and brandy. After eating this marsala, I don't want him to find the real thing!


And yes, it's on a bed of my homemade egg noodles!

I just have to say, being married to a man who cooks like this is amazing!

Thanks for reading!
Julie

Thursday, November 4, 2010

Other Creative Pursuits

As I mentioned in my Nov. 2 entry, I spent a weekend in Des Moines with Sarah in October. Not only did we attend a Stampin' Up! regional, but we also went to a pasta-making class at Prairieland Herbs!

Here we are with some of our delicious creations:


And here is the ravioli. Isn't it beautiful? This batch had squash and sweet potato filling.


Did you know that homemade pasta is easy? It's easier than making pie dough (which I've just never mastered, even though baking is one of my favorite past times). And, homemade pasta takes only 1-2 minutes to cook in boiling water. One of my DH's favorites, of course, is the ravioli. I've already made pasta once at home since the class...hope to continue!

Thanks for reading,
Julie

Tuesday, November 2, 2010

Magnetic Christmas

October flew by! I was busy with two stamping workshops, attending a regional meeting in Des Moines (where I had one of the workshops at my BFF Sarah's house), and a special 10-10-10 event. On 10-10-10 (October 10, 2010), Heidi and I hosted 15 of our fellow stampers at an event where everyone made 10 projects in under 10 minutes each for a $10 fee. It was a hit!

One of the projects (well, actually two) was this cute magnet and matchstick box.


The magnet uses the snowman image from Jolly Old St. Nick, which is a limited-edition set in the Stampin' Up! Holiday Mini Catalog. I stamped him on Whisper White cardstock, colored him with blender pens and Real Red and Basic Black ink, and then punched him out with a 1-inch circle punch. I put Stampin' Up!'s two-way glue on the back of a clear stone from a mega-pack from dollar store, then stuck the punched-out snowman on it. Then, a small magnet from the craft store is glued to the back of the paper. That glue is amazing! It holds up the stone and the magnet, no problem!

The little box is the matchstick box die used with the Big Shot die-cutting machine. I used Crumb Cake and Whisper White cardstock, then decorated it with Marina Mist ink the the snowflake background stamp, again from the Jolly Old St. Nick set.

I think I'm going to make a little pile of these for stocking stuffers. So...if you're expecting Christmas trinkets from me, pretend you didn't just read that!

I hope everyone got out and voted tonight! And if you're here in Minnesota, you have another hour to get 'er done. Get going!

Thanks for reading,
Julie

Wednesday, September 29, 2010

Animal Prints!

Hello! So, I went back to my roots and found a way to use something that would otherwise be wasted (thanks, Mom and Grandma!). Read on...

Here are two cards that use an animal-print background, which is not something you can find in the current Stampin' Up! Idea Book & Catalog. You can make your own! Take the leftover rubber from a new clear-mount stamp set, trim it into scraps, and then adhere them to a clear-mount stamp in an animal-print or mosaic-type pattern. Ink it up, and stamp it down! I used clear block D, so I had to repeat the design several times to cover a card.


The "S" card was for one of my Stampin' Sistas on the occasion of her (insert milestone) birthday. I used basic black classic ink on soft suede paper to get a leopard-type look. The layer is soft suede, then very vanilla torn with soft suede on the edges. The accent colors are peach parfait (the polystitch ribbon!) and wild wasabi.


The giraffe card is the demonstration that I showed at a recent workshop. It's more mustard classic ink on whisper white paper. I also used marina mist for a layer, and hemp twine for the accent. It's the Fox and Friends stamp set (a current fave!).

Thanks for reading!
Julie

Wednesday, September 22, 2010

Cheers to You!

The rain is falling, the wind is whipping, and we're snuggled up with a little trashy TV and wireless internet. Happy Fall!

Here are a couple photos of a project I whipped up last week for a departing coworker. The first picture is the card FOR her, as in, "Cheers to You for following your dreams!" The second is a group of cards I made as her gift, so she could keep in touch with her friends and family here in Minnesota as she moves across the country. Best wishes, B!


This is the "Cheers to You" stamp set from Stampin' Up! I just used Whisper White cardstock, basic black ink, blender pens, various inks, and the two-way glue pen and Dazzling Diamonds glitter. I love the simplicity, and so did she!

Stay dry tonight, especially if you live in Minnesota or Wisconsin (and probably Iowa)!

Thanks for reading,
Julie


e

Monday, September 20, 2010

Monkeys and Giraffes, oh my!

Hi there! I know it's been a little while...no excuses, though! First, how about this beautiful sky view at Bass Lake, near Cohasset, MN, where we spent our Labor Day weekend? Gorgeous!


And here's the stamping portion of the program:


This is a quick card I made for a friend's son. I used the Fox and Friends set from the 2010 "big book," or Idea Book & Catalog, that is, along with card stock in Soft Suede, Pumpkin Pie and Marina Mist. The inks are Pumpkin Pie, So Saffron, and Marina Mist, and an antique brad and white grosgrain ribbon finish off the card!

These animal motifs are also available as Decor Elements for decorating your kids' rooms. They're between 6" and 8" square. Let me know if you'd like to learn more about those!

And now, I'm up way too late for a work night. Off to bed!

Thanks for stopping by,
Julie

Wednesday, August 25, 2010

More Welcome Homes

Welcome home seems to be a recent theme around here. This was the second project at Mary's house, though I'll spare you the step-by-step on this one. It's called Many Welcomes, and doesn't it look just perfect in her family room? Thanks for letting me exploit your home, Mary, for the benefit of my blog!

These are so easy to install (just takes a bit of patience), and they'll come off clean, so no damage to the walls. I need to get some in my own house....oh, I ordered one for the bathroom. I just need to take the time to put it up.

Thanks for reading,
Julie

Sunday, August 22, 2010

Mary and Julie install some art

Vinyl wall art, that is. My friend Mary wanted a way to keep a chore chart on the wall that wouldn't fall down when her teenage sons breezed in and out the laundry room door. She loved the new chalkboard Decor Elements from Stampin' Up! Let's hope this also helps the chores get done!

The chosen space (above).


Me peeling back the "transfer sheet" after thoroughly rubbing it onto the wall (above).


Mary works on applying the second layer, the "chore chart" part of the project (above).


The finished product! I'll have to check in with Mary to see if the chores are all done this week...

Have a great Sunday,
Julie

Wednesday, August 18, 2010

Welcome Home

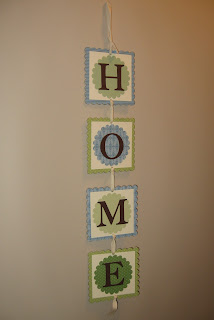
One of my best friends from high school moved back to the Midwest two weeks ago after spending several years on the East coast! To help her, her husband and their toddler warm up their new place, I made this simple hanging "Home" sign. I love making these, because they're so simple, but make a statement.


I used the Big Shot, a Stampin' Up! designer paper pack (subtles collection), Very Vanilla and Early Espresso cardstock, and 3/8" twill tape. The Big Shot dies were the Scallop Square and Circles #2.

I'm so happy you're here, Kahla (and J and little S)!

Thanks for reading,
Julie

Monday, August 9, 2010

The one about laughing with my nephew

My nephew, Daniel, is 2 1/2. He's a riot. Seriously. Check out this photo. It's from last Halloween, and I don't even know what was so funny. I just love this photo, and though I don't scrapbook much, thought I'd use this photo as a perfect sample to show off at workshops.


Supplies
Paper: In Color 6x6 patterns paper stack (Hostess), Pear Pizzazz; Peach Parfait card stock; Early Espresso for die-cut letters
Dies: Sizzix sizzlet "Naturally Serif" alphabet; "L" from Serif Essentials die set

And, if you were wondering about the two workshops I had last Thursday and Sunday, they were great! Thanks to Elizabeth, Barb and Amanda for being such gracious hostesses! I look forward to helping them close out their parties and choose their free products!

Thanks for reading,
Julie

Tuesday, August 3, 2010

The one about getting ready for two REAL workshops

My first real workshops, as in not hosted by myself, are this week! One will be hosted by my coworker, who had gotten away from stamping when she had her beautiful children, and whose husband is now wondering why I had to appear on the scene! Thanks, Elizabeth! The second will be hosted by my neighbors, mother and daughter duo Barb and Amanda. They are avid card makers and scrapbookers, so I better get my game face on!

At the workshops, the make-n-take will use Stampin' Up! Presto Patterns Designer Series Paper. This stuff is like the old lemon-juice-on-paper trick! Use a little ink on a sponge, and presto! the pattern appears. Here's a sneak peak at the project.


Supplies
Stamp sets: Because I Care (Hostess set--ask me how to earn one!)
Paper: Presto Patterns Designer Series Paper, Certainly Celery Cardstock, Concord Crush Cardstock (one of the limited-edition "In Colors")
Ink: Concord Cruch, Certainly Celery
Tools: Modern Label and Scallop Oval Punches

Thanks for stopping by!
Julie

Saturday, July 31, 2010

The one about starting a blog

I started a blog when I started my Stampin' Up! business. Thankfully, the business has taken off better than the blog! I consider my first event, an open house on July 18, a success. And then a stamping friend submitted a surprise order, not tied to the open house. Thanks, friend!

From my open house, two friends booked workshops. Yay! Those are coming up this next week, Thursday and Sunday (not tomorrow). I've been preparing for them today, designing the make-n-take, deciding on hostess gifts, and trying to think of a door prize.

Even more exciting than the new business success...one of my childhood best friends is moving back to the Midwest from the East Coast this week, and she's landing right in my town! I am so excited I can hardly stand it. That's why I'm trying to get my workshops in order this weekend...so I can just concentrate on helping my friend and her family unpack and aclimate to little ol' Zumbrota.

And now I'm back to blogging! Here's the photo for this post. It was the 3-D item I demonstrated at my open house. How cute, copied from my upline Heidi, and using two things from the kitchen--an ice cream lid for the circle template and a brown lunch sack.


Supplies
Stamp sets: Tart n Tangy, Perfect Punches
Paper: Whisper White, Wild Wasabi
Ink: Daffodil Delight, Pumpkin Pie, Wild Wasabi
Tools: Scallop Border Punch, Oval Punch, Oval Scallop Punch
Embellishment: White grosgrain ribbon, 1/4"

Thanks for reading!
Julie

Saturday, July 10, 2010

The one about the man's tie and the wedding card

One day, I was sitting in a meeting (remember, day job in PR) and rather than focusing on the topic at hand, I began focusing on the speaker's tie. A beautiful tie is was. Black with a gold background pattern and a stunning ivory calla lily as the focal point. I thought, "I could totally turn that into a card!" I snapped back to the present, hastily scribbled "black background, gold, ivory lily" in the corner of my notepad, like I just had a brilliant thought about the current discussion, and got back into the meeting.

I got home that night and went right to work! What came out of a couple design experiments is this card.

The Medallion background stamp was inked with Encore metallic gold (no longer sold by Stampin' Up!, but I made this card in early June), and a similar effect could be found using Champagne Mist shimmer paint or embossing the image with gold embossing powder. I embossed the rose from Fifth Avenue Floral set using VersaMark ink and gold embossing powder. The ribbon is the retired 5/8" ivory organza (current substitute: 5/8" organza ribbon in Whisper White or 5/8" satin ribbon in Very Vanilla). "For the Newlyweds" sentiments is from Teeny Tiny Wishes set stamped in Elegant Eggplant classic ink, and it's punched with the Word Window and layered on Elegant Eggplant cut with the Modern Label Punch.

Supplies (all SU!)
Stamp sets: Fifth Avenue Floral, Teeny Tiny Wishes
Paper: Basic Black, Very Vanilla, Elegant Eggplant
Ink: Encore Gold Metallic ink, VersaMark, Elegant Eggplant
Embellishments: Gold embossing powder, 5/8" ivory organza ribbon (retired SU!), Word Window and Modern Label punches

Enjoy your Saturday! I'm excited to go to this wedding, and I always manage to get nostalgic about my own wedding day nearly eight years ago as I watch the ceremony. I love weddings!

Thanks for reading,
Julie

Tuesday, July 6, 2010

The one about the half-done bathroom revamp

My bathroom revamp was simple by home-improvement standards: paint. Paint the primer-white bathroom with a beautiful, dark gray from Ace Hardware called "Medium Gray." (With all the fancy paint-color names in the world, I had to choose "Medium gray?" Anyway.) One would think that painting a bathroom would be a quick project. It's less than half the size of a regular room, right? At least mine is. Oh no, it took a day-and-a-half, the same amount as the apple-green craft room took two years ago. But it's done! It took most of Friday and part of Saturday. Isn't it way better, even with the drop cloth and blue tape?


So, on Sunday, I wanted to re-hang the cabinet (see first photo). This project involved the help of DH, who does not love interior home improvement projects. We got the cabinet hung. He left the room. It promptly fell off the wall. He got industrial-strength screw anchors from the garage (who knew?). It hasn't fallen off the wall in three days. We're good.

I couldn't resist buying new towels! New towels! Like new shoes for the bathroom! They're waiting patiently for their new towel rack. I still have a few finishing touches, but wanted to show you how much better the room looks with just the paint update.

And, as promised, here is the make-n-take card that we'll be making at my Stampin' Up! open house launch.
Supplies (all Stampin' Up!)
Stamp sets: Watercolor Trio, Teeny Tiny Wishes
Paper: Sahara Sand, Whisper White, Pretty In Pink
Embellishments: Pretty In Pink 1/4" grosgrain ribbon

Thanks for reading,
Julie

Saturday, July 3, 2010

The one about the 4th of July, the open house, and the painting project

Happy 4th of July! As we celebrate our country’s independence, let’s remember to give thanks for those who continue to keep our country free, including my husband’s cousin and uncle. Both have served tours in Iraq, and his cousin is set to deploy for a second time later this year. I’m interested in learning more about the efforts to send cards to soldiers…if you have information, please e-mail me or leave a comment below!

And, on this long weekend (my day job is in public relations for a major medical center), I’ve been busy getting my legs under me for my new Stampin’ Up! business AND painting the master bathroom. Pictures of the painting project to come later. For now, take a look at this invitation I prepared for my very first open house, to be held at my home on July 18.

The background is tone-on-tone stamped with the rose stamp from Fifth Avenue Floral, Going Gray classic ink on Going Gray cardstock. The details part is printed from my computer on Whisper White cardstock, then the lily from the same set is stamped in Perfect Plum classic ink in the white space. I finished it off by using the Scallop Trim punch, adhering the front piece to the background, and tying on a length of the new 1/8" black satin ribbon.


Supplies (all supplies Stampin' Up!)
Stamp Set: Fifth Avenue Floral
Paper: Basic Gray, Whisper White
Ink: Basic Gray, Perfect Plum
Embellishment: 1/8” Black Satin Ribbon, Scallop Trim Border punch

I need to get working on making samples and preparing the make-n-take!

Thanks for reading,
Julie