Julie Moenck

Card making, home decorating and an occasional random musing.

Tuesday, November 15, 2011

Color variation on a wedding card

A quick post tonight to show you another colorway with a card I showed back on October 2 - this one with Elegant Eggplant, Basic Black, Brushed Silver and White. A texturz plate, used with the Big Shot, gives a great fondant-like texture to the cake, and Basic Jewels - Pearls make beautiful decorations! I have to confess, the ribbon is 3/8" grosgain in retired Eggplant, but I just had to use it. All us Stampin' Up! demonstrators have a stash of those fave retired items, right?

This card was for my sister and her new husband. It was a lovely ceremony in mid-October. For some photos, check out the sample album on the photographer's Facebook page.

Thanks for stopping!
Julie

Wednesday, November 2, 2011

Gently Falling Trees

There's a beautiful stamp set in the Holiday Mini Catalog called Gently Falling (check it out to the right). It's a Two-Step Stampin' set, which means it has a background shape and an outline that work together to create dimensional images. Well, one of the images looks like a tree if you only do the first step! How quick and easy, and technically, half the work!

In the photo above, I used it to make evergreen-type trees in the fall color combo of More Mustard, Bravo Burgundy and Old Olive.

In this photo, I used Always Artichoke and Cherry Cobbler for a traditional Christmas card design. Clean and simple - my favorite kind. The beautiful ribbon is also new in the holiday mini catalog - it's quilted satin ribbon in Cherry Cobbler!

Thanks for reading! Have a great November!

Julie

Tuesday, November 1, 2011

Come to the Holiday Expo November 19!

Hi Everyone! Just a quick note to invite you all to the Zumbrota Holiday Expo at the VFW on November 19! More than 20 local vendors for all your holiday shopping needs (including gifts for yourself!).


See you there!

Julie

Monday, October 3, 2011

Best things come in twos!

Gently Falling is a beautiful new set from Stampin' Up! that features several different leaf shapes, and "Two-Step Stampin'!" The leaf below is actually done with two stamps - a general leaf shape that's the lighter orange (Tangerine Tango in SU! terms) and the darker rust color (Cajun Craze) is a line drawing that makes the outline on top of it.

I also used Early Espresso card stock, Paisley Petals Designer Series Paper, linen thread and buttons from the designer buttons "brights" assortment. This card was inspired by page 16 in the Holiday Mini catalog (click icon to the right to check it all out!).
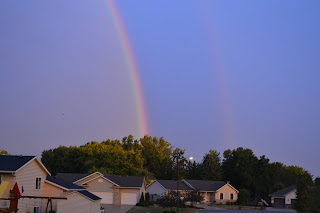
And the discussion of "two-step stamping" led me to share this photo, snapped about a week ago around 7:30 a.m. when we had a brief rain shower while it was still sunny out. Look at the beautiful double rainbow! (The second rainbow is to the right of the first one.)


Thanks for stopping! Let me know if you want to learn more about two-step stamping, either in a girls' night out workshop at your home (you can earn free stuff!) or in a class at my house.

Julie

Thursday, September 29, 2011

Red Hats and a Wedding Card

Recently, my husband's cousin got hitched! It was a beautiful wedding, but what I'm sharing here is from the shower. All guests at this wedding shower got to choose a hat from Grandma's collection to wear for the festivities.


For the lovely couple, I made this wedding card, for which I've seen inspiration around the web. It's simple, using Stampin' Up!'s Whisper White card stock, cut into small rectangles with the corners rounded off. I used a texturz impressions plate to make the subtle pattern, and then used Basic Jewels - Pearls as accents. A little Real Red grosgrain ribbon "ties" it all together.


Card stock is Basic Black, Real Red and Brushed Silver. A tip when using the silver paper...it's kind of slick, so use a strong adhesive, like Stampin' Up!'s sticky strip, so the layers don't peel apart. (This is a lesson learned while making about 10 prototypes for my sister's wedding invitations...we used sticky strip in the end so that no one's invitation arrived in pieces!).

I'll show that wedding invitation after the wedding...which is is 13 days!

Thanks for stopping by,
Julie

Tuesday, August 16, 2011

Birthday Card(ed) in Vegas

Hey all! So, I'm trying to stick with the Wheel of Fortune "Before and After" theme. We'll see how long it goes/how clever I am. Today, I've got a birthday card to show you, and then a few pictures from Vegas...where yes, I was carded. But it was at the airport. For my boarding pass.

For the card-making part of the presentation, here's a summery greeting using some brand-new items in the 2011-2012 Stampin' Up! Idea Book & Catalog.

The stamp sets are Pennant Parade, from the Idea Book & Catalog, and Swirls & Curls Verses, the hostess set from the 2011 Summer Mini catalog (see the link on the right--only available through August 31!).

The colors are Calypso Coral and Wisteria Wonder--new 2011-2012 "In Colors"--and Certainly Celery and So Saffron from the core colors in the big book. Some designer series patterned paper, baker's twine and basic jewels-pearls round out the look. I made this at a recent workshop, and it was a hit! If you'd like to make something like this in your home with your friends, let me know!

And now...here's some of what my DH and I (okay, and my BFF and her hubs) call "The Vegas." I tagged along on a work trip for DH...all the fun of The Vegas and no work! What's not to love? Except the slot machines, most of which didn't love me, even though I kept going back for more!


Love the water show at Bellagio! I was playing with the "guide" mode on my Nikon D3100, which set itself to take "moving water" pictures. I think it did an awesome job!

Here is DH, looking all official on the phone. If you remember the post about winter activities, yes, this is the same man who smokes meat when it's below zero in Minnesota in the winter!

And a final, parting shot. Oh, The Vegas, I love you...even though you take all my money in slot machines and shopping!

Thanks for stopping,
Julie

PS: I was not compensated for mentioning the D3100...I just really love it!

Friday, August 12, 2011

Projects with My Husband

In my last post, I promised you a photo of the pizza I made the second night (leftover dough, remember?) with my DH. You'll see there's only half left because we dug in so quickly, I forgot to grab the camera.

My half, the right half, is made with the whole wheat pizza dough, sweet honey barbecue sauce, grilled chicken and red onions. The left half, DH's half, has some kind of hot wings sauce on it. Woo-wee! It was kind of on fire. He loved it. I'm always surprised at how fast homemade pizza can come together; it makes a great meal.

And to continue of the theme of linking food to a card sample, below is a card I made for my husband (mentioned above) to use.

This is a thank you card that I made for my husband to send out after his SURPRISE 35th birthday party (I should have blogged about THAT!). He requested I make some cards for this reason, I did not MAKE him send thank yous. What a guy!


Crumb Cake and Whisper White card stock, Medallion background stamp, Sincere Salutations stamp set, (retired) Night of Navy 5/8" grosgrain ribbon, Night of Navy classic ink.

Simple, masculine and easy to mass-produce!

Thanks for reading,
Julie

Monday, August 1, 2011

Before and After: Chicken Pesto Pizza Card

This is Before and After, as in the Wheel of Fortune game where the word in the middle is shared by the word or phrase before and after, but it's two separate things. So this post is not about a Chicken Pesto Pizza Card, but rather, a chicken pesto pizza and a pizza card. Just check it out.

Kahla and I were stuck *all alone* (ok, her cute two-year-old daughter was with us, too) without our chef-husbands about two weeks ago. Really. Stuck. They do most of the cooking. And they're super fabulous at it. And they like to cook. They don't use recipes, and it's creative. All. The. Time.

We didn't really want to drive back into Rochester to go out, so look what we came up with! We were super proud of ourselves...a little whole wheat pizza dough (from a mix, not even just a frozen dough hunk), garlic scape pesto (homemade by Kahla and respective husband), shredded mozzarella, grilled chicken and fresh tomato (probably from a farmer's market; Kahla brought it). Look!

This photo alone makes me think I could be a food blogger. I'd just make this pizza every day, and photograph it like this, every day. Would you keep reading? Hmmm... Could I get endorsements?

Well, regardless, it was tasty. Tase-tee. Mmm. Tune in later this week, and I'll show you the barbecue version I made with my respective husband the next night. There was half the dough left. I *had* to have pizza two days in a row.

OK, now onto the "After" part of this game show: the pizza card!

I received a swap (cards Stampin' Up! demonstrators make to trade with each other at events, so we can have lots of samples and ideas without having to do them all ourselves) at Convention in July in Salt Lake City that used the new Pennant Builder punch to make a pizza slice! It was so creative. So, here's my take on it, using another new product, the Stampin' Up! stripes embossing folder. A demonstration at Convention showed us how to make gingham with the folder!


To make the gingham, use your ink pad to ink up the Stripes embossing folder and run it through the Big Shot. Carefully remove the paper, ink up the folder again, and put the same paper back in, turned 90 degrees. Run it through again. Voila! Gingham!

Let me know if you have any questions about this one! I love it.

Thanks for stopping!
Julie

Saturday, July 23, 2011

Storms and Stamping

High winds and big rain today in southeast Minnesota. This is what I spent my afternoon doing instead of stamping. This is our backyard, already half-way cleaned up, after a big storm rushed through at 10:30 a.m.

It was mostly just big branches and a couple tree tops, but it sure made a big mess. Throughout our little town, there were trees in streets and the obligatory large branch through a parked car's window.

But, never fear. I have a card to share! This is one I love that I made back in April. The ribbon is retired (5/8" grosgrain), but you can get a similar effect with the 5/8" satin ribbon in white. It might look even more elegant!


If you're wondering about the shimmery background...it's Stampin' Up! Vanilla Shimmer Smooch Spritz with a couple drops of Bashful Blue classic ink re-inker added! This is a way to get colored Smooch Spritz in 50 colors!

Well, I need to make a card for tomorrow...so off I go! I'll post that one later...don't want to spoil the surprise for the recipient.

Thanks for stopping,
Julie

Monday, July 18, 2011

Delicate Doilies peek-a-boo!

The weather is crazy here in southeast Minnesota! It's only 11 a.m. and we're fast-approaching 100* F with thick humidity. I'm an old farm girl...can't resist talking about the weather!

So, to keep cool, why don't you stay inside and stamp? I just returned from Stampin' Up!'s annual convention in Salt Lake City, UT, and I've got tons of ideas to share. Watch for them here in the coming days, and if you'd like to see more, get in touch to set up your own private class with some friends!

Here's a card I prepared with new products from the 2011 Idea Book and Catalog, which was release July 1. I love the peek-a-book quality. Check out the photo and scroll down to get the details!
Card stock: So Saffron, Melon Mambo, Pretty in Pink, Whisper White
Designer Series Paper: Delicate Doilies (new in the 2011 Idea Book and Catalog)
Stamp Set: Curly Cute (from the Summer Mini Catalog)
Tools: Big Shot, Scallop Circles #2 die, Doily Triple Layer Punch
Embellishments: Stampin' Dimensionals and a button from the Sale-a-bration pack, but you can substitute one from the Bold Brights button pack

To get the peek-a-boo effect, take the piece of So Saffron card stock and place it over Scallop Circles #2 die so you get all of the small circle and some of the larger one. Run it through the Big Shot, and you will have the "windows" in the card stock. Layer this piece over the Delicate Doilies designer paper, and voila! you have a peek-a-book layered look.

Give this quick project a try today...and stay cool!

Thanks for stopping by,
Julie

Wednesday, April 13, 2011

A Good Egg

I just love the name of this stamp set, "A Good Egg." I borrowed it from Heidi, and I kept saying, "I have to get A Good Egg from Heidi." My other friend looked at me and said, "Don't you have good eggs at home?" OK, so maybe it's only funny to me, but I think it's hilarious.

Here's a "treat sleeve" you can make up quick for a simple Easter gift. It's a half-sheet of Stampin' Up! card stock in Pretty in Pink (cut the 5.5" x 8.5" way), scored and folded at 4" and 8" (leaves a 1/2" tab that you use to adhere it together). The edge is trimmed with the eyelet border punch. A small piece of the Designer Series Paper stack in the subtles patterns is adhered to that, and then "A Good Egg" is used to stamp the chick, which is colored with Stampin' Write markers in Daffodil Delight and Pumpkin Pie. A bit of ribbon and a cello bag slid inside finish it off. You can stick some candies inside. Yum!


We made this as the make-n-take at Tonya's workshop, where she had several friends over to learn about paper crafts, make a project and enjoy some treats that she so generously provided. If you'd like to host a workshop and earn free stamps (or paper or punches or buttons or...), just let me know!

Happy Easter, and thanks for reading!
Julie

Sunday, April 10, 2011

Circles and Cupcakes

I know it's been a month since I've checked in here...with snow, melting, more snow, more melting, a 75 degree day in April (in Minnesota!)...I guess I just got confused by the weather? Well, it's as good of an excuse as any, which mostly means I have none.

Here are two of the other cards we made at Intro to Stamping card class back in March. Circle Circus stamp set is used in the one of the left with some fun spring colors. The Create a Cupcake stamp set and the Build a Cupcake punch are used in the one on the right. I like this one because it's not all pink and cupcakey...just something a little different.


The cupcake set and punch are available in the Occasions Mini Catalog, which is available through the end of this month. See the link to the right to check out the whole catalog.

Thanks for reading!
Julie

Saturday, March 12, 2011

Upcoming "Intro to Stamping" class

The snow is flying here...again. This is headed to be the longest winter ever, I'm pretty sure. And it's at the point where snowmobiling season is over because the trails are rough, icy and melty, so the snow can really just go now. I'm ready for spring!

Here are two of the five cards we'll be making at my upcoming "Intro to Stamping" class on Saturday, March 19, from 10 a.m.-12 p.m. at my home. They have a nice, spring-y look to them, don't you think?

This one is a simple outline stamp, colored in with Stampin' Up! markers and adorned with a single, shiny rhinestone. Clean and simple--you don't need a roomful of supplies to get started with card making!


This one is a CASE (copy and share everything!) from my upline Heidi. I love a cherry motif! We'll color right on the stamp with markers to get the green stem and the red cherry, all in one step. A great technique for getting more out of your markers!

Details of the class: $10 for 5 cards, each featuring a different "getting started" technique. If you're an experienced stamper, please join us! It's always great to get a refresher or pick up a new design idea. To sign up for the class, just e-mail me! Can't wait to see you here.

I'm headed off to a workshop this afternoon--love them! I have some cute projects to show from that, too...maybe tomorrow. Stay tuned. And with daylight savings tonight, we've got to be about ready to turn the corner into better weather, right? At least we'll get more daylight!

Thanks for reading,
Julie

Sunday, March 6, 2011

Circus, Anyone?

Doesn't life just feel like a circus sometimes? I can't say it happens to me often, as I only have to try to keep track of myself and my husband (no kids, no pets), but every so often, things just seem to go a little crazy.

Maybe that's why I was drawn to the Stampin' Up! set, Circle Circus, recently for a couple different cards. The first was "commissioned" (ooh, doesn't that make me sound like a fancy artist?) by a coworker. It was for some special teenagers in her life, so I went for a trendy combo of colors, and well, just went a little crazy.


I used Marina Mist card stock for the card base, then layers of Early Espresso and Pumpkin Pie (scrumptious, almost). The green accents are Old Olive, and the Classic Ink colors are all coordinating with the paper.

The next one was just to say hello to a special little guy and his parents. I thought primary colors were cute for a little boy, so I dug into Pacific Point, Real Red and Daffodil Delight card stock. Again, the ink is all coordinating, and the ribbon is Real Red 1/4" grosgrain. The cute border is the Scallop Edge Border punch.


It's still Sale-A-Bration time at Stampin' Up!, which means for every $50 order, you get to choose a free, exclusive stamp set! Sale-A-Bration lasts through March 31, so you've got time to host a workshop or place an order. Contact me to learn more!

Have a great Sunday night!
Julie

Sunday, February 27, 2011

Stage presence!

Hello! Back on February 12, I presented ON STAGE at the Stampin' Up! regional conference in Minneapolis. I submitted my animal-print background technique and was chosen to be part of the "Workshop Wow!" line up. It was super cool to share this with the 500 other demonstrators in attendance, and it came with cool perks like getting in the hall early to get front-row seats for the day and earning a free stamp set.

Above, I'm on stage. The camera was pointed at my work area, so my demonstration was shown on the big screen, but I was talking to the crowd.
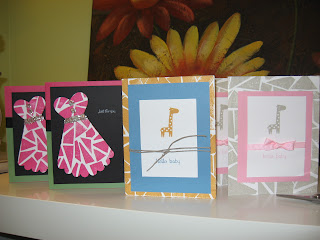

These were all the samples I took with me to share, but I only showed the basics of the technique on stage. I didn't have to make all the cards. Another big accomplishment--I managed to stay just under my allotted five minutes!

Stay tuned this week for more on Stampin' Up!'s great promotion that's going on this month--Sale-A-Bration! For every $50 order, you can choose one free stamp set from an exclusive list! If you want to know more before I have a chance to write more, let me know!

Thanks for reading!
Julie

Sunday, January 2, 2011

Happy New Year!

One thing it seems crafty people like nearly as much as crafting itself is how to organize their crafting supplies. I'm no different. Sometimes I'll waste an entire afternoon getting ready to make cards or sew something up.

So today, along with apparently half of the population of the Minneapolis-St. Paul metro area, I trundled to IKEA. I got there within the first hour of the store opening, and I got the last one of the particular EXPEDIT shelving unit I wanted! It was like I won an eBay auction! Whew. (I have no affiliation with IKEA).

Here's what it looked like when I opened the two boxes. I wondered if this would be easy to put together, or a disaster.


I managed to put the whole thing together myself, except for getting DH to help align one panel. The directions even had these funny cartoons that showed you should have two people to do the work, not just one.

The finished product gives a fun, storage vibe. Hopefully it keeps me more organized in 2011! Or at least makes more space for the additional crafting supplies I'm sure I'll accumulate.


Of course, I didn't take a picture of the closet that's half torn apart while reorganizing...

Happy New Year!

Julie